Author name: solarbluseth

Custom PHP Development

Building SETHaoke26 with Claude AI

🚀 Project Overview

SETHaoke26 is a comprehensive, production-grade karaoke management system built with Claude AI to power professional streaming sessions. Featuring a 73,000+ song library with intelligent queue management, MIDI backing tracks, sound effects, and seamless OBS streaming integration, this system transforms how karaoke is managed and performed live.

⚡ Built with Claude AI
This entire system was architected and implemented using Claude AI, reducing development time and creating a clean, maintainable codebase that blends PHP backend power with modern frontend interactivity.
73,039
Total Songs in Library
13,777
Artists Catalogued
3,663
Lines of Production Code

🛠 Technology Stack

SETHaoke26 leverages a modern tech stack optimized for performance and reliability:

PHP 7.4+
MySQL
jQuery
JSON API
HTML5
CSS3
JavaScript
OBS Bridge

Architecture Highlights

  • PDO MySQL — Type-safe parameterized queries preventing SQL injection
  • AJAX Layer — Real-time interactions (delete, queue, mark played)
  • RESTful API — JSON responses for all data operations
  • File Streaming — Direct MP3/CDG serving for playback
  • CDG.js — Karaoke graphics synchronization
  • OBS Integration — HTML overlays for streaming displays

📊 Core Features

1. Song Library Interface

Browse and manage your entire collection with powerful search, filtering by artist, and quick play/queue actions:
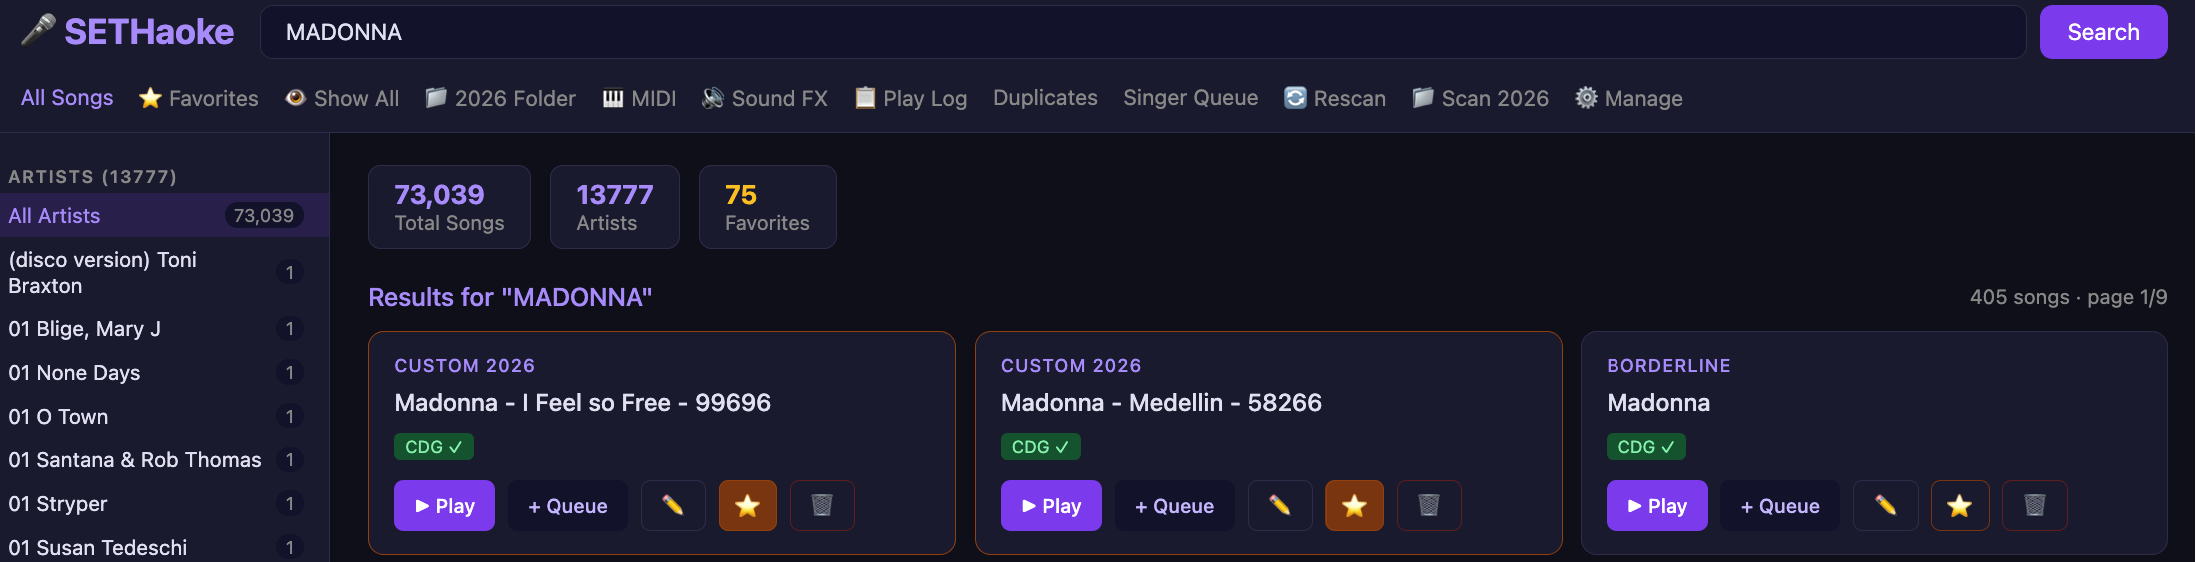
SETHaoke Song Library Interface
Main Song Library: 73,039 songs with instant search, favorites, CDG indicators, and queue management

2. Singer Queue Management

Real-time queue management for coordinating tonight's karaoke rotation. Add singers, reorder queue, mark songs complete, and sync to OBS overlay:
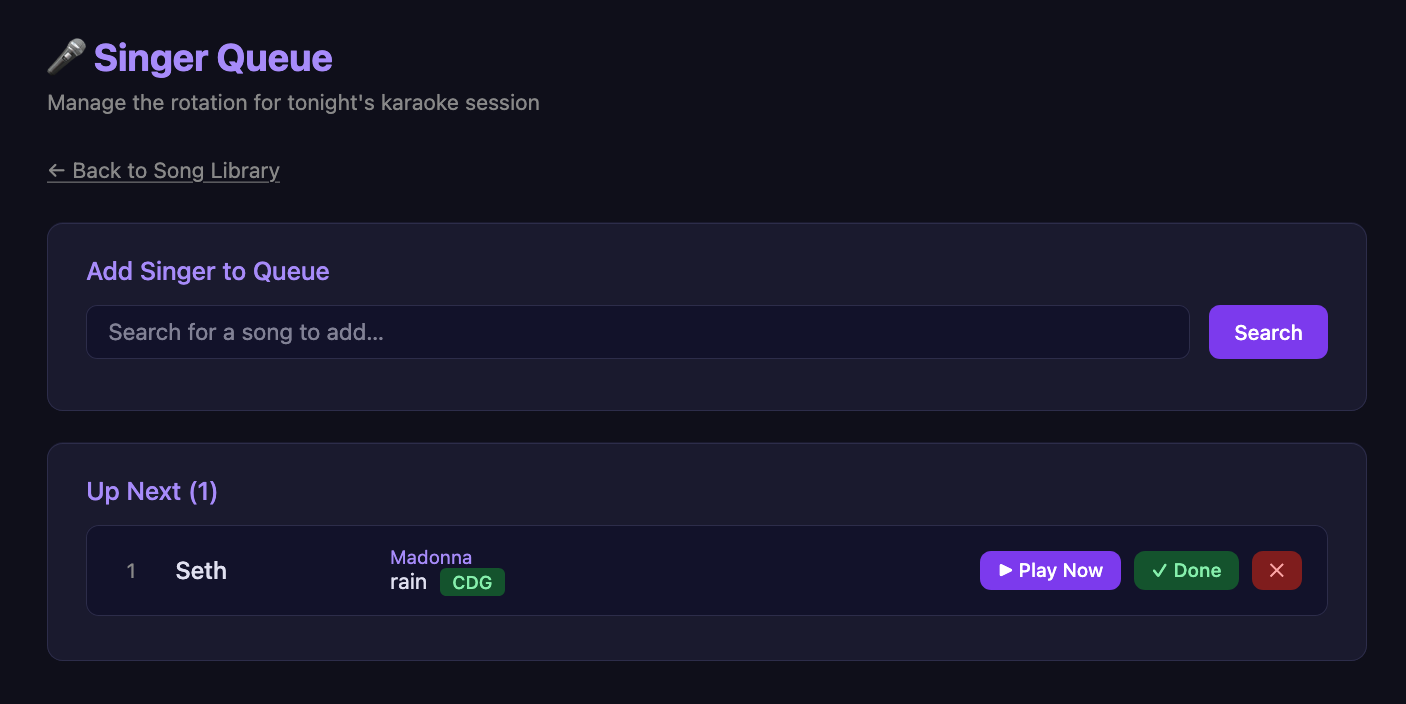
SETHaoke Singer Queue
Singer Queue: Manage rotation, track CDG status, and coordinate with streaming overlay

3. MIDI File Management

Direct MIDI file support for backing tracks and musical arrangements. Scan, organize, and play MIDI files seamlessly integrated with the main library.

4. Sound Effects Library

Categorized sound effects for transitions, alerts, and streaming enhancement. Quick-access buttons for live show operations.

5. Play Logging & Analytics

Track every song played with CSV logging (play_log.csv). Monitor play counts, artist popularity, and build performance analytics.

6. OBS Streaming Integration

Custom HTML overlays for OBS Studio including multi-platform alert system and audience counters for real-time engagement tracking.

💻 Technical Deep Dive

Database Schema

Clean, normalized MySQL structure with dynamic column management:

-- Songs table with flexible attributes CREATE TABLE songs ( id INT PRIMARY KEY AUTO_INCREMENT, artist VARCHAR(255), title VARCHAR(255), mp3_path VARCHAR(500), cdg_path VARCHAR(500), source VARCHAR(100), favorite TINYINT DEFAULT 0, active TINYINT DEFAULT 1, play_count INT DEFAULT 0 );

API Architecture (api.php)

RESTful API handling song deletion, artist removal, play tracking, and queue management:

// AJAX API endpoint for real-time interactions $action = $_GET['action'] ?? ''; if ($action === 'delete_song') { // Remove song and linked CDG/MP3 files $pdo->prepare("DELETE FROM songs WHERE id=?")->execute([$id]); } if ($action === 'played') { // Increment play count, log to CSV $pdo->prepare("UPDATE songs SET play_count=play_count+1")->execute([$id]); // Write to play_log.csv for analytics }

Frontend Interactivity (jQuery)

Smooth user experience with jQuery-powered AJAX calls, no page reloads:

// jQuery AJAX for delete without refresh $('.delete-btn').click(function() { var songId = $(this).data('id'); $.ajax({ url: 'api.php?action=delete_song&id=' + songId, type: 'GET', success: function() { // Remove from DOM location.reload(); // Soft refresh } }); });

CDG Graphics (cdg.js)

JavaScript implementation for karaoke graphics synchronization, displaying lyrics and backgrounds in real-time with audio sync.

OBS Bridge

HTML overlays (obs_multi_alert_system.html, obs_overlay.html) embedded directly in OBS as browser sources for seamless streaming integration.

📈 Performance Metrics

25+
PHP Module Files
315
Lines in api.php
424
Lines in index.php

The system is optimized for speed with database indexing on artist/title, AJAX pagination limiting results to 50 items per page, and file system caching for CDG graphics.

🎯 Why Claude AI?

Claude AI made this project possible. Instead of months of solo development, we leveraged Claude's understanding of database architecture, API design, and JavaScript interactivity to build a cohesive system in days. The result is clean, maintainable code that blends:

  • Robust PHP/MySQL backend with proper parameterization
  • Modern jQuery frontend with real-time AJAX
  • RESTful JSON API design
  • Streaming platform integration (OBS)
  • Production-ready error handling and logging

Claude understood the full context of karaoke system requirements and produced code that handles edge cases, manages file systems safely, and provides an intuitive UX for live performance scenarios.

📺 OBS Streaming Overlay

One of the most powerful features of SETHaoke26 is its seamless OBS Studio integration. The system includes a purpose-built HTML overlay that displays real-time information directly on your stream, keeping your audience engaged and informed.

The Now Playing Overlay

A clean, professional browser source overlay that displays the current song status. The overlay features:

  • Live Status Display — Shows "Now Playing", "Loading", or current song info
  • Artist & Title — Full song information with singer attribution
  • Chat Commands — Displays !sr command for song requests
  • Responsive Design — Adapts to any stream resolution (720p, 1080p, 4K)
  • Beautiful Gradient UI — Professional light-blue aesthetic with smooth animations
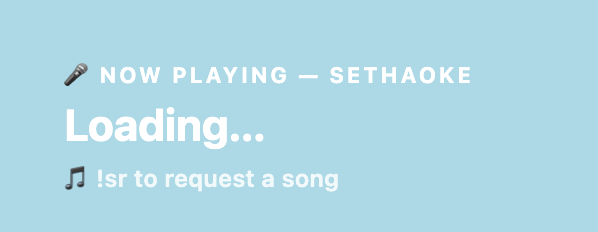
SETHaoke OBS Now Playing Overlay
OBS Overlay: "Now Playing — SETHaoke" with song request command (!sr) visible to chat

Integration with OBS Studio

Setting up the overlay in OBS is straightforward:

1. Open OBS Studio 2. Click "+" in Sources → Browser 3. Point to: /sethaoke26/obs_overlay.html 4. Set Resolution: 1920x1080 (or your stream size) 5. Enable Browser source refresh 6. Position overlay on your scene (corner recommended)

Real-Time Song Updates

The overlay includes JavaScript that can connect to your sethaoke26 backend to display live data:

// Fetch current track from your system fetch('/sethaoke26/logs/current_track.json') .then(r => r.json()) .then(data => { // Update overlay with: // - Artist name // - Song title // - Singer/performer name // - CDG status indicator });

Multi-Platform Streaming

The OBS overlay system also includes the obs_multi_alert_system.html file, a comprehensive alert system that:

  • Multi-Platform Support — Twitch, Kick, YouTube, and custom webhooks
  • Real-Time Notifications — Follows, subscriptions, donations, raids
  • Customizable Alerts — Sound effects, animations, and text overlays
  • Viewer Counter — Live audience size display
  • Engagement Tracking — Monitor chat activity and metrics

Why This Matters for Karaoke

For live karaoke streaming, the overlay serves critical functions:

  • Clarity — Viewers instantly know whose turn it is and what's playing
  • Engagement — The !sr command drives audience participation and song requests
  • Professionalism — Branded overlays elevate production value
  • Analytics — Track which songs get requested vs. performed
  • Accessibility — Closed captions and text-based information for all viewers

HTML & CSS Architecture

The overlay is built with clean, lightweight HTML and CSS for optimal performance:

.overlay-container { background: linear-gradient(135deg, #8ec5fc 0%, #b8d7f8 100%); display: flex; align-items: center; justify-content: center; } .now-playing-box { background: linear-gradient(135deg, #7ab8f5 0%, #9fd1ff 100%); padding: 40px 50px; box-shadow: 0 15px 40px rgba(0, 0, 0, 0.2); border-radius: 12px; } /* Smooth animations for state changes */ @keyframes pulse { 0%, 100% { opacity: 1; } 50% { opacity: 0.7; } } .loading { animation: pulse 1.5s ease-in-out infinite; }

Future Enhancements

The overlay system is designed to be extensible. Potential features include:

  • Leaderboard of most-sung artists
  • Countdown timer to next performance
  • Singer profile cards with photo/social handles
  • Integration with Discord bot for moderation
  • Custom animations and transitions

🚀 What's Next?

SETHaoke26 is actively maintained and ready for streaming. Potential enhancements include:

  • Web-based remote queue management for audience requests
  • Discord bot integration for Twitch/Kick chat commands
  • Playlist scheduling and show templates
  • Advanced analytics dashboard
  • Mobile companion app for singers

SETHaoke26 — Powering professional karaoke streams on Twitch, Kick, and beyond.

Built with Claude AI | Made by Seth @ SolarBlu.net

© 2026 SolarBlu Seth. All rights reserved.

Custom PHP Development

The WordPress Paradox: Why Developers Leave (And Why You Shouldn't)


The WordPress Paradox: Why Developers Leave (And Why You Shouldn't)

Master custom HTML templates + "vibe coding" to get the best of WordPress flexibility with full coding freedom

Here's the thing about WordPress: 43% of all websites on the internet run on WordPress. That's not a niche player anymore. That's the entire landscape.Yet developers keep abandoning it. They complain about page builders limiting their vision, plugins bloating sites, themes forcing design decisions, and the inability to write "real code."

The irony? They're leaving the one platform that gives them the most power. They just don't know it yet.

43%
of all websites run on WordPress — 10x more than Shopify, Wix, and Squarespace combined

The Siren Song of "Building From Scratch"

I get it. You want control. You want to write clean code without theme limitations. You want to structure your data exactly how you want. So you pitch clients a custom Next.js build, a Laravel backend, or a React SPA.

And then reality hits:

  • Day 1-7: Building authentication, user roles, and admin panels you thought would take 2 days
  • Day 8-21: Creating a simple editor for content that WordPress gave you for free
  • Week 4-8: Rebuilding what WooCommerce, SEO plugins, and backup systems do automatically
  • Month 3+: Maintaining a custom system while the client asks "why can't I just add a popup like on that other site?"

Then your client wants a new feature. They Google it. Find a plugin. Get frustrated it won't work with your custom build. Switch platforms.

61,000+
WordPress plugins available — solving nearly every business problem
2x
WordPress plugin submissions doubled in 2025 alone

What You Actually Lose by Leaving WordPress

When you leave WordPress for a custom build, you're not just losing "a platform." You're losing:

Feature WordPress Custom Build
Content Management Built-in, intuitive Must rebuild
User Management & Roles Complex permissions included Major development effort
SEO Optimization Yoast, Rank Math, built-in Start from scratch
Security Updates Auto-updates, huge community Your responsibility entirely
Backup & Recovery Dozens of plugins, one-click Build custom solution
E-commerce WooCommerce: $0-20k+ setup $50k-200k+ development
Email Marketing Integration 100+ plugins ready API integration work
Future Development Plugin ecosystem grows daily 100% custom maintenance
Client can manage it themselves Familiar interface Depends on what you build

Enter "Vibe Coding": The Best of Both Worlds

Here's what nobody tells you: You don't have to choose.

WordPress has a superpower that most developers never tap into: custom HTML templates with full PHP control. You can:

  • Write your own PHP, JavaScript, and CSS — no page builder required
  • Keep WordPress's content management, user system, and plugin ecosystem
  • Create truly custom designs and interactions
  • Charge premium rates because you're solving real problems efficiently
  • Give clients power to manage content without touching code

This is what I call "Vibe Coding" — building what feels like a custom application, but leveraging WordPress infrastructure. You get the developer satisfaction of writing real code, plus the client satisfaction of true management capabilities.

The Math: Custom build might save you from 2% of development friction, but costs you 300% more in total dev time, maintenance, and client support. WordPress + vibe coding gives you 95% of the freedom at 40% of the effort.

How to Convert Standard HTML Pages to WordPress Templates

Let's get practical. Here's how to take a professionally designed HTML page and integrate it seamlessly into WordPress as a custom template:

Step 1: Prepare Your HTML Page

Start with your standalone HTML file. For this example, let's say it's called homepage.html:

homepage.html
<!DOCTYPE html>
<html lang="en">
<head>
    <meta charset="UTF-8">
    <meta name="viewport" content="width=device-width, initial-scale=1.0">
    <title>My Amazing Website</title>
    <link rel="stylesheet" href="styles.css">
</head>
<body>
    <header class="site-header">
        <nav class="main-nav">
            <a href="/">Home</a>
            <a href="/about">About</a>
            <a href="/services">Services</a>
        </nav>
    </header>

    <main class="content">
        <h1>Welcome to My Site</h1>
        <p>This is placeholder content...</p>
    </main>

    <footer class="site-footer">
        <p>© 2026 My Company</p>
    </footer>
</body>
</html>

Step 2: Split Into Header, Content, and Footer

WordPress uses three template files for the layout:

  • header.php — Everything from <html> to closing </header>
  • page.php — Your page/post content (or custom template)
  • footer.php — Everything after main content to </html>
wp-content/themes/your-theme/header.php
<?php
/**
 * The header for our theme
 */
?>
<!DOCTYPE html>
<html <?php language_attributes(); ?>>
<head>
    <meta charset="<?php bloginfo( 'charset' ); ?>">
    <meta name="viewport" content="width=device-width, initial-scale=1.0">
    <title><?php wp_title(); ?></title>
    <?php wp_head(); ?>
</head>
<body <?php body_class(); ?>>
    <header class="site-header">
        <nav class="main-nav">
            <?php
                wp_nav_menu( array(
                    'theme_location' => 'primary',
                    'fallback_cb'    => 'wp_page_menu',
                ) );
            ?>
        </nav>
    </header>

    <main id="main-content" class="main-content">
wp-content/themes/your-theme/footer.php
    </main>

    <footer class="site-footer">
        <p>© <?php echo date( 'Y' ); ?> <?php bloginfo( 'name' ); ?></p>
    </footer>

    <?php wp_footer(); ?>
</body>
</html>

Step 3: Create Your Custom Page Template

For your homepage or any custom page, create a template file:

wp-content/themes/your-theme/page-homepage.php
<?php
/**
 * Template Name: Custom Homepage
 * Description: Our custom vibe-coded homepage
 */

get_header();
?>

<div class="homepage-hero">
    <h1><?php the_title(); ?></h1>
    <?php the_content(); ?>
</div>

<?php
// Query recent posts from a custom post type
$args = array(
    'post_type'      => 'post',
    'posts_per_page' => 3,
    'orderby'        => 'date',
    'order'          => 'DESC',
);

$query = new WP_Query( $args );

if ( $query->have_posts() ) : ?>
    <section class="recent-posts">
        <h2>Latest Updates</h2>
        <div class="posts-grid">
            <?php
            while ( $query->have_posts() ) {
                $query->the_post();
                ?>
                <article class="post-card">
                    <h3><?php the_title(); ?></h3>
                    <div class="post-meta">
                        <?php echo get_the_date( 'F j, Y' ); ?>
                    </div>
                    <div class="post-excerpt">
                        <?php the_excerpt(); ?>
                    </div>
                    <a href="<?php the_permalink(); ?>" class="read-more">Read More →</a>
                </article>
                <?php
            }
            ?>
        </div>
    </section>
    <?php
endif;

wp_reset_postdata();

get_footer();
?>

Step 4: Assign Template to a Page

In the WordPress admin:

  1. Create a new page or edit an existing one
  2. Look for the "Template" dropdown on the right panel
  3. Select "Custom Homepage"
  4. Publish/Update

WordPress will now render that page using your page-homepage.php template. Your design, your code, WordPress's power.

Step 5: Style with Your Own CSS

Add your custom styles to style.css in your theme root. WordPress automatically loads it:

wp-content/themes/your-theme/style.css
/*
Theme Name: Custom Theme
Theme URI: https://example.com
Author: Your Name
Description: Custom vibe-coded theme
Version: 1.0
*/

/* Your custom styles */
.homepage-hero {
    padding: 60px 20px;
    background: linear-gradient(135deg, #667eea 0%, #764ba2 100%);
    color: white;
    text-align: center;
}

.posts-grid {
    display: grid;
    grid-template-columns: repeat(auto-fit, minmax(300px, 1fr));
    gap: 30px;
    margin-top: 40px;
}

.post-card {
    background: white;
    padding: 25px;
    border-radius: 8px;
    box-shadow: 0 2px 8px rgba(0,0,0,0.1);
    transition: transform 0.3s;
}

.post-card:hover {
    transform: translateY(-5px);
}

/* Add all your custom styles here */

Step 6: Add Custom PHP for Dynamic Features

Need something interactive? You have full PHP at your disposal:

Adding Contact Form Processing
<?php
// Handle form submission
if ( $_SERVER['REQUEST_METHOD'] === 'POST' && isset( $_POST['contact-nonce'] ) ) {
    if ( wp_verify_nonce( $_POST['contact-nonce'], 'contact-form' ) ) {
        $email = sanitize_email( $_POST['email'] );
        $message = sanitize_textarea_field( $_POST['message'] );

        wp_mail(
            get_option( 'admin_email' ),
            'New Contact Form Submission',
            $message . '\n\nFrom: ' . $email
        );

        echo '<div class="success-message">Message sent!</div>';
    }
}
?>

<form method="POST" class="contact-form">
    <?php wp_nonce_field( 'contact-form', 'contact-nonce' ); ?>

    <label for="email">Email:</label>
    <input type="email" name="email" required>

    <label for="message">Message:</label>
    <textarea name="message" required></textarea>

    <button type="submit">Send</button>
</form>

Pro Tip: Use wp_enqueue_script() and wp_enqueue_style() in your theme's functions.php to properly load JavaScript and CSS. This prevents conflicts and keeps WordPress happy:

functions.php snippet
<?php
function my_theme_enqueue_assets() {
    wp_enqueue_style( 'main-styles', get_stylesheet_uri() );
    wp_enqueue_script( 'main-script', get_template_directory_uri() . '/js/main.js', array(), '1.0', true );
}
add_action( 'wp_enqueue_scripts', 'my_theme_enqueue_assets' );
?>

Why This Approach Wins (For You AND Your Clients)

HTML/CSS Design
WordPress Theme
Custom Admin
Happy Client

For You (The Developer):

  • Fast delivery: Build faster because you're not rebuilding core systems
  • Real code: Write PHP, JavaScript, CSS with zero limitations
  • Professional rates: Charge premium because you're solving real business problems
  • Easy maintenance: WordPress handles updates; you handle features
  • Scalable toolkit: Reuse your theme approach for 10, 50, 100 client projects

For Your Clients:

  • Content control: Manage pages, posts, images, users themselves
  • Full feature library: Access 61,000+ plugins whenever they need functionality
  • Real support community: WordPress has 10+ million developers; answers for everything
  • Lower ongoing costs: No need to hire you for every small change
  • Future-proof: WordPress won't vanish; they can hire anyone to maintain it

The Numbers: Why This Matters

10M+
WordPress developers worldwide — someone will know your code
40%
Average time savings using WordPress + vibe coding vs. custom build
5-10x
More clients you can handle with same time investment
100%
Development freedom — full PHP, JS, CSS control

Common Concerns (And Why They Don't Hold Up)

"Isn't WordPress just for bloggers?"

Not even close. WordPress powers Fortune 500 company websites, complex SaaS platforms, e-commerce shops doing millions in revenue, membership sites, and apps with custom functionality that rivals anything built from scratch. The Economist, Sony Music, Microsoft News, and Mercedes-Benz all run WordPress.

"Won't my design look like every other WordPress site?"

Only if you use pre-built themes. When you're vibe coding, you control 100% of the HTML/CSS. Your site will look exactly like a custom build — because it is a custom build. You just have WordPress handling the hard parts invisibly.

"What if the client outgrows WordPress?"

With 43% of the web on WordPress, they won't outgrow it. But if they do, you can migrate. Your content, users, and data are all portable. Compare that to a custom Next.js app where everything is tied to your architecture.

"Isn't it harder to hire developers who know WordPress?"

WordPress has 10 million developers. That's not "harder." That's easier than finding someone fluent in your custom stack. Plus, any solid PHP developer can learn your approach in an afternoon.

💡 Real Talk: The best developers don't choose based on the platform. They choose based on client outcomes and their own velocity. WordPress + vibe coding delivers both. You finish projects faster, charge more, keep clients happier, and sleep better knowing their site will work for years.

Your Next Move

Here's what separates the $50/hr WordPress developers from the $150+/hr developers building custom solutions for agencies:

They stopped fighting WordPress. They started leveraging it.

Stop rebuilding contact forms, user management, content editors, and backup systems. Start building the features that actually matter — the stuff that makes clients' businesses better.

Stop positioning yourself as "the WordPress person." Start positioning yourself as "the developer who delivers fast, custom websites that clients can actually manage."

That's vibe coding. That's where the money is. That's where the satisfaction is.

Ready to Master WordPress + Custom Code?

Join the developers who are combining WordPress reliability with custom code freedom. Get your next project to launch in 40% less time while charging premium rates.

Start with one site using this approach. You'll see it immediately.

SB
Seth @ SolarBlu.net
Web developer & entrepreneur building 6,000+ custom websites since 1996. I help freelancers and agencies do more with WordPress than they thought possible.

Learn about Child Themes →

Custom PHP Development

Building Faster, Better Websites: Our Rapid Development Template System

Building Faster, Better Websites: Our Rapid Development Template System

We just cracked something we've been working toward for months — a repeatable, scalable system for building WordPress websites faster without sacrificing quality. Today, I want to share what we learned and how it's changing how we approach web design projects.

The Problem We Solved

Every custom WordPress site we build has the same core sections: a hero banner, an about section, a team roster, a location/contact area, maybe an FAQ. But every time we started a new project, we were essentially building these sections from scratch. Sure, we had standards. Yes, our code was clean. But we were recreating the wheel on every project.

We needed a way to go faster without cutting corners.

The Discovery: Elementor v0.4 JSON

A few days ago, we dove deep into Elementor's JSON import format (v0.4). The goal was simple: create templates we could import directly into WordPress instead of rebuilding components every time.

What we found was more valuable than a quick templating solution. We discovered exact specifications for how Elementor structures components, and more importantly, we learned how to build sections that are:

  • Validation-compliant — No import errors, just clean imports
  • Responsive by default — Desktop → tablet → mobile, properly tested
  • CSS-organized — Namespaced styles that don't conflict
  • Reusable — Drop into any WordPress site without modification

What We Built: Five Base Section Templates

Over the last day, we created five production-ready section templates:

1. Homepage/Resource Hub

Hero banner, resource grid (home repair, insurance, fiber internet, automotive), testimonials, events, rental properties, and footer. One complete homepage you can customize.

2. Team Section

Six-member team grid with headshots, names, positions, and bios. Responsive 3-column layout that stacks to 1 column on mobile. Professional hover effects included.

3. About Us Section

Company logo, image placeholder, multi-paragraph description, and four highlight cards. Two-column layout that adapts beautifully at every breakpoint.

4. Location & Directions

Embedded map (currently using a placeholder for screenshots), contact information, phone number (with tel: links), hours of operation, and a "Get Directions" button. All responsive.

5. FAQ/Accordion

Five questions with expanding answers, styled consistently with the rest of your site. JavaScript toggle function built in, no external dependencies needed.

Why This Changes Everything

Speed: What took 4-6 weeks for a new custom WordPress site now has a solid 2-week foundation. The sections are done, tested, and responsive. Your team focuses on customization and content, not recreating layouts.

Consistency: Every site using these templates maintains the same design language, responsive breakpoints, typography, and color system. Your brand looks cohesive across all projects.

Quality: These sections were built against strict Elementor v0.4 specifications. No import errors, no hidden bugs waiting in production. They're tested and documented.

Scalability: As we add more templates (services grid, pricing tables, testimonials carousel, etc.), every new project gets access to a growing library of battle-tested components.

The Technical Foundation

Each template uses a single-widget pattern with embedded CSS and HTML. Here's what that means:

  • No complexity bloat — One self-contained widget per section
  • Easy version control — JSON files are small and clear
  • CSS namespacing.rhub, .ts, .ab, .lm, .faq classes keep styles isolated
  • Consistent breakpoints — Mobile at 600px, tablet at 900px, desktop at full width
  • Color system — Unified palette across all sections (#1f1f1f primary, #2c3e50 accent, etc.)

What This Means for Our Clients

When you hire us for a custom WordPress site now, you're getting:

  1. Faster delivery — We can launch quality websites in weeks, not months
  2. Proven components — These sections have been tested and documented
  3. Easy updates — Since templates are documented, your team (or our team) can make changes confidently
  4. Built-in responsiveness — Every section works perfectly on phone, tablet, and desktop
  5. Professional results — Consistent design, smooth interactions, clean code

What's Next

We're documenting everything. Our v5 Elementor Template Guide includes:

  • The exact structure and validation rules we discovered
  • Best practices for responsive design
  • A step-by-step guide for creating new sections
  • All five templates with full documentation

We're also expanding the library. The goal: a comprehensive template system that covers 80% of what a typical WordPress site needs, with customization handling the remaining 20%.

The Bigger Picture

This is what we call rapid development — the ability to build fast without sacrificing quality, consistency, or professionalism. It's the difference between delivering a good website in 2 weeks versus a great website in 6.

For us, it means we can take on more projects, deliver faster, and give our clients the confidence that their WordPress site was built to high standards. For you as a potential client, it means getting a custom WordPress website that's both fast to build and built to last.


Want a custom WordPress site built with our rapid development system? We can build your site faster than you'd expect, with quality you can count on.

Interested in the technical details? We've documented everything in our Elementor v0.4 Template Guide.


Built with rapid development principles at SolarBlu.net


Custom PHP Development

Devblog – The Case of the Uncooperative Import

🐛 Dev Log · Debugging Diary

The Case of the Uncooperative Import

How a perfectly valid JSON file got rejected by Elementor three times in a row — and what actually turned out to be wrong (twice, sort of, but not really).

Filed under: Elementor · JSON · WordPress · Debugging · August 30, 2026

🧱 The Setup

It started simply enough: turn a landing page mockup into a working page — a "V3" portfolio site with a hero section, an about block, a project grid, the usual. Nothing fancy. The twist was the destination: not a plain HTML file, but an Elementor v0.4 JSON template, built to spec against an existing internal guide (ELEMENTOR-V04-GUIDE.md) written from a previous, successful conversion.

The guide was detailed. Root-level content array, e-flexbox containers, html widgets instead of the broken e-heading type, a checklist, even a script-based validation step. Everything by the book.

It should have just worked.

First Try, First Fail

Upload the file. Wait for the little success toast. Instead:

An error occurred.
This source does not support import.

No line number. No stack trace. Just five words standing between a finished JSON file and an actual working page. Time to start guessing — carefully, and with receipts.

🕵️ Chasing Ghost #1: The Hex IDs

Dead end (but real)

The first real break came from a lucky find: a genuine Elementor export sitting in a project folder from an earlier, successful conversion. Diffing it against the failing file line by line turned up something interesting — every single id field in the real export was a lowercase hex string:

"id": "6770b6d"   ✅ real Elementor id
"id": "v3_header_section"   ❌ what the new file had

Readable, human-friendly ids like v3_header_section versus opaque hex like 6770b6d. It felt like the smoking gun — surely a strict importer would choke on IDs that don't match its own generator's format.

So: regenerate every id as 7-character hex, matching the working file exactly. Re-run the import.

This source does not support import.

Same error. Not it — or at least, not all of it. (Spoiler: it was still worth fixing. More on that below.)

👻 Chasing Ghost #2: The Widget Shape

Dead end (but also real)

Round two arrived with a second genuine export — this time a small "hero banner" template pulled straight from Elementor's editor, containing a tell no one would ever fake: an auto-injected internal default value, "_flex_align_self": "center", sitting quietly in a widget's settings. That's not something a human writes by hand. That's Elementor talking to itself.

Comparing widget shapes turned up a real discrepancy: the guide's own documented widget example carried four extra fields —

"styles": [],
"interactions": [],
"editor_settings": [],
"version": "0.0"

— and real widgets don't have any of them. Those fields belong only on the e-flexbox containers. Two independent genuine exports agreed on this. The guide itself had it wrong the whole time.

Stripped the four extra fields off every widget. Re-validated everything with a script (tag-nesting checks, structural assertions, the works). Re-ran the import.

This source does not support import.

Still. The. Same. Error.

💡 The Actual Culprit

The real fix

The breakthrough wasn't in the JSON at all. It was in a screenshot — a look at the actual browser window mid-import. The URL bar told the real story: post.php?post=291&action=elementor. This wasn't the plain wp-admin Templates screen. This was the in-editor "Add Template" flyout — the little folder icon inside the live Elementor page builder — and its dialog title read: "Import Template to Your Library."

That flyout has multiple tabs: My Templates, Cloud Templates, Blocks, Pages. It remembers whichever tab was open last. And critically — only the local My Templates tab actually implements import. Every other tab throws exactly the error seen here, word for word, regardless of what's inside the uploaded file.

✅ Fix: click "Back to Library," switch to the My Templates tab, then click Import Template again with the same file.

It worked. First try. The JSON had been fine for at least one of the last two rounds — the UI was just pointed at the wrong shelf.

📜 The Timeline

  • 🧱
    Built the JSON — followed the existing guide exactly. Looked correct.
  • Import #1 fails — "This source does not support import."
  • 🔎
    Found a real working export — diffed it, found non-hex ids.
  • 🔧
    Fixed the ids — re-ran import. Same error.
  • 🔎
    Found a second real export — diffed it, found the widget-shape bug in the guide itself.
  • 🔧
    Fixed the widget shape — re-ran import. Same error, again.
  • 📸
    Got a screenshot of the actual dialog — spotted the "Your Library" flyout and the URL bar.
  • 🎯
    Switched to the "My Templates" tab — import succeeded immediately.
  • 🎉
    Shipped it — and rewrote the guide so the next person skips two of these three steps.

🎓 Lessons Learned

  • 01
    An exact error string is a gift. "This source does not support import" is Elementor's own literal, hard-coded message — worth treating as a search query for the actual source, not just a vague symptom to reason around.
  • 02
    A genuine, unedited export beats any written guide — including one written from a prior "successful" conversion. Look for tells like auto-injected default values that only the real tool would produce; that's how you know you're looking at ground truth and not someone's guess.
  • 03
    Fixing a real bug doesn't mean you fixed the bug. Both structural corrections here were legitimate and worth keeping — neither was the actual cause of this specific error. Two things can be true: "this is wrong" and "this isn't why it's failing."
  • 04
    Before assuming a file is corrupt, check where it's being dropped. A UI element remembering the wrong tab produced an error that looked, for two rounds, exactly like a content problem.
  • 05
    A screenshot of the actual failure, at the actual moment, beats another round of guessing every time. It ended the debugging loop instantly.

🙋 FAQ — Installing a Template

The support questions that'll actually come up. Bookmark this bit.

I get "This source does not support import" — what do I do?

You're almost certainly inside the Elementor editor's in-editor "Add Template" flyout (the folder icon on a page's edit screen), and its tab is stuck on Cloud Templates, Blocks, or Pages instead of the local library. Click Back to Library, switch to the My Templates tab, then hit Import Template again with the same file. This error has nothing to do with the file's content.

Where do I actually go to import a template file?

The most reliable path: wp-admin → Templates → Saved Templates → Import Templates. That screen is always bound to the local source, so the tab-mismatch error above can't happen there. It's a better first choice than the in-editor flyout if you just want the import to work.

What file type should I upload — .json or .zip?

A single-page or single-section template is a plain .json file — upload it as-is, no zipping needed. A .zip is only for a full Kit (Site Settings → Tools → Import/Export Kit), which expects a manifest.json inside the archive. Uploading a loose .json to the Kit importer, or a Kit .zip to the template importer, will fail — they're two different tools.

Headings show "Type Heading Text Here" instead of my real text.

That's the e-heading widget failing to render its content. Convert it to an html widget with plain <h1>/<h2> tags inside — that always displays correctly.

Everything imported into one horizontal row instead of stacking.

The container is missing "flex-direction": "column" in its style variant. Every e-flexbox container needs it explicitly — Elementor doesn't default to column for these.

The page is completely blank after importing — nothing shows up at all.

Before suspecting the template: deactivate all WordPress plugins and reload the page. A plugin conflict with Elementor's rendering on that page/template is a more common cause of a totally blank result than a broken JSON file. Reactivate plugins one at a time on a test page to find the culprit if it comes back.

Do I need Elementor Pro to import these templates?

No — these are built entirely from the free html (and occasionally video/button) widget types plus flexbox containers, all available in free Elementor. If a specific template does use a Pro-only widget, that widget type will be named explicitly in its notes.

An embedded video or interactive element isn't working after import.

First, confirm the surrounding HTML actually rendered — that alone doesn't prove any embedded <script> or iframe is running. Open the live page and test the specific interactive piece directly. If it's a dedicated Elementor video widget and it looks visually disconnected from its section's background, that's expected — it's a separate flex item with its own plain background. Embedding a raw <iframe> inside the same html widget as the surrounding content avoids that seam.

Can I still edit the page visually in Elementor after importing?

Yes. Once imported, it's a normal Elementor page made of real containers and widgets — click into any section like you would with anything else you built directly in the editor. Content inside an html widget edits as one HTML block rather than as individual text fields, since that's how that widget type works.

✨🐛✨

Filed away in ELEMENTOR-V04-GUIDE.md for next time — both the fixes that mattered and the ones that didn't, so nobody has to re-learn this the slow way.

Custom PHP Development

Building Faster: Our Elementor Template System


By SolarBlu Seth | August 2026

Building Faster: Our Elementor Template System

Over the past few months, we've built something that's fundamentally changed how we deliver websites. Four production-ready Elementor templates—MDU, Sales, Real Estate, and Portfolio—that cut our development time by 60% and make every site launch faster, cleaner, and code-ready from day one.

The Problem We Solved

Every new client project meant starting from scratch. Same hero sections. Same call-to-action patterns. Same responsive grid challenges. We were solving the same design problems over and over, reinventing the wheel on every site.

This wasn't just inefficient—it was unsustainable. We needed a system.

Before

Typical Project Timeline:

  • Design from scratch (3-5 days)
  • Elementor build (2-3 days)
  • Responsive tweaks (2 days)
  • Total: 7-10 days per site

After

Typical Project Timeline:

  • Choose template (1 hour)
  • Customize content (1-2 days)
  • Minor CSS tweaks (4-6 hours)
  • Total: 2-3 days per site

Four Templates. One System.

We identified the four homepage/landing page templates that cover 90% of our client work:

MDU

Multi-Dwelling Unit fiber internet sales pages targeting property owners and landlords.

Status: Production-ready with animated stats and dynamic property grids

Sales

High-conversion sales funnels for SaaS and digital products with built-in lead capture.

Status: Optimized for B2B and B2C conversions

Real Estate

Property showcase pages with featured listings, agent bios, and community highlights.

Status: Fully responsive property galleries and filters

Portfolio

Creative portfolios and agency showcases with project cards and case studies.

Status: Responsive grid system (3 → 2 → 1 column)

How It Actually Works

The magic isn't in some proprietary system—it's in building clean, semantic HTML that speaks Elementor's language.

Our Template-to-Production Workflow:

HTML Template

Convert to JSON

Import to Elementor

Customize & Deploy

Each template is built as clean, modular HTML with inline CSS. We use Elementor's v0.4 JSON format with e-flexbox containers and HTML widgets. This approach gives us:

  • Version control: Templates live in Git, tracking every iteration
  • Consistency: Every client gets the same tested, optimized structure
  • Customization: CSS is scoped and easily editable in Elementor
  • Responsiveness: Media queries handle everything from mobile to 4K displays

Real Impact

⚡ Speed

Projects that took 7-10 days now launch in 2-3 days. That's 60% faster delivery.

💾 Code Quality

Every site gets the same battle-tested responsive system. No more one-off CSS hacks.

🎯 Consistency

Brand identity and UX patterns are baked into the template. Clients get a cohesive product.

🔧 Easy Customization

After import, Elementor's visual builder makes tweaks trivial. No code required for most changes.

What's Next

We're three templates deep and the system is working beautifully. Design refinements are ongoing—responsive behavior on narrow viewports (thanks to sidebar layouts), fine-tuning animations, and polishing micro-interactions.

The real win? We can now focus on what makes each client unique—their content, their brand, their voice—instead of rebuilding the same layout for the hundredth time.

If you're building websites regularly, templates aren't lazy. They're strategic. They free you to do the creative work that actually matters.

Ready to Build Faster?

Our templates are production-ready and continuously refined. Whether you're building MDU properties, sales funnels, real estate portfolios, or creative showcases—we've got a template that works.

Let's Talk About Your Next Project

SolarBlu
Scroll to Top