Custom PHP Development

Devblog – The Case of the Uncooperative Import

🐛 Dev Log · Debugging Diary

The Case of the Uncooperative Import

How a perfectly valid JSON file got rejected by Elementor three times in a row — and what actually turned out to be wrong (twice, sort of, but not really).

Filed under: Elementor · JSON · WordPress · Debugging · August 30, 2026

🧱 The Setup

It started simply enough: turn a landing page mockup into a working page — a "V3" portfolio site with a hero section, an about block, a project grid, the usual. Nothing fancy. The twist was the destination: not a plain HTML file, but an Elementor v0.4 JSON template, built to spec against an existing internal guide (ELEMENTOR-V04-GUIDE.md) written from a previous, successful conversion.

The guide was detailed. Root-level content array, e-flexbox containers, html widgets instead of the broken e-heading type, a checklist, even a script-based validation step. Everything by the book.

It should have just worked.

First Try, First Fail

Upload the file. Wait for the little success toast. Instead:

An error occurred.
This source does not support import.

No line number. No stack trace. Just five words standing between a finished JSON file and an actual working page. Time to start guessing — carefully, and with receipts.

🕵️ Chasing Ghost #1: The Hex IDs

Dead end (but real)

The first real break came from a lucky find: a genuine Elementor export sitting in a project folder from an earlier, successful conversion. Diffing it against the failing file line by line turned up something interesting — every single id field in the real export was a lowercase hex string:

"id": "6770b6d"   ✅ real Elementor id
"id": "v3_header_section"   ❌ what the new file had

Readable, human-friendly ids like v3_header_section versus opaque hex like 6770b6d. It felt like the smoking gun — surely a strict importer would choke on IDs that don't match its own generator's format.

So: regenerate every id as 7-character hex, matching the working file exactly. Re-run the import.

This source does not support import.

Same error. Not it — or at least, not all of it. (Spoiler: it was still worth fixing. More on that below.)

👻 Chasing Ghost #2: The Widget Shape

Dead end (but also real)

Round two arrived with a second genuine export — this time a small "hero banner" template pulled straight from Elementor's editor, containing a tell no one would ever fake: an auto-injected internal default value, "_flex_align_self": "center", sitting quietly in a widget's settings. That's not something a human writes by hand. That's Elementor talking to itself.

Comparing widget shapes turned up a real discrepancy: the guide's own documented widget example carried four extra fields —

"styles": [],
"interactions": [],
"editor_settings": [],
"version": "0.0"

— and real widgets don't have any of them. Those fields belong only on the e-flexbox containers. Two independent genuine exports agreed on this. The guide itself had it wrong the whole time.

Stripped the four extra fields off every widget. Re-validated everything with a script (tag-nesting checks, structural assertions, the works). Re-ran the import.

This source does not support import.

Still. The. Same. Error.

💡 The Actual Culprit

The real fix

The breakthrough wasn't in the JSON at all. It was in a screenshot — a look at the actual browser window mid-import. The URL bar told the real story: post.php?post=291&action=elementor. This wasn't the plain wp-admin Templates screen. This was the in-editor "Add Template" flyout — the little folder icon inside the live Elementor page builder — and its dialog title read: "Import Template to Your Library."

That flyout has multiple tabs: My Templates, Cloud Templates, Blocks, Pages. It remembers whichever tab was open last. And critically — only the local My Templates tab actually implements import. Every other tab throws exactly the error seen here, word for word, regardless of what's inside the uploaded file.

✅ Fix: click "Back to Library," switch to the My Templates tab, then click Import Template again with the same file.

It worked. First try. The JSON had been fine for at least one of the last two rounds — the UI was just pointed at the wrong shelf.

📜 The Timeline

  • 🧱
    Built the JSON — followed the existing guide exactly. Looked correct.
  • Import #1 fails — "This source does not support import."
  • 🔎
    Found a real working export — diffed it, found non-hex ids.
  • 🔧
    Fixed the ids — re-ran import. Same error.
  • 🔎
    Found a second real export — diffed it, found the widget-shape bug in the guide itself.
  • 🔧
    Fixed the widget shape — re-ran import. Same error, again.
  • 📸
    Got a screenshot of the actual dialog — spotted the "Your Library" flyout and the URL bar.
  • 🎯
    Switched to the "My Templates" tab — import succeeded immediately.
  • 🎉
    Shipped it — and rewrote the guide so the next person skips two of these three steps.

🎓 Lessons Learned

  • 01
    An exact error string is a gift. "This source does not support import" is Elementor's own literal, hard-coded message — worth treating as a search query for the actual source, not just a vague symptom to reason around.
  • 02
    A genuine, unedited export beats any written guide — including one written from a prior "successful" conversion. Look for tells like auto-injected default values that only the real tool would produce; that's how you know you're looking at ground truth and not someone's guess.
  • 03
    Fixing a real bug doesn't mean you fixed the bug. Both structural corrections here were legitimate and worth keeping — neither was the actual cause of this specific error. Two things can be true: "this is wrong" and "this isn't why it's failing."
  • 04
    Before assuming a file is corrupt, check where it's being dropped. A UI element remembering the wrong tab produced an error that looked, for two rounds, exactly like a content problem.
  • 05
    A screenshot of the actual failure, at the actual moment, beats another round of guessing every time. It ended the debugging loop instantly.

🙋 FAQ — Installing a Template

The support questions that'll actually come up. Bookmark this bit.

I get "This source does not support import" — what do I do?

You're almost certainly inside the Elementor editor's in-editor "Add Template" flyout (the folder icon on a page's edit screen), and its tab is stuck on Cloud Templates, Blocks, or Pages instead of the local library. Click Back to Library, switch to the My Templates tab, then hit Import Template again with the same file. This error has nothing to do with the file's content.

Where do I actually go to import a template file?

The most reliable path: wp-admin → Templates → Saved Templates → Import Templates. That screen is always bound to the local source, so the tab-mismatch error above can't happen there. It's a better first choice than the in-editor flyout if you just want the import to work.

What file type should I upload — .json or .zip?

A single-page or single-section template is a plain .json file — upload it as-is, no zipping needed. A .zip is only for a full Kit (Site Settings → Tools → Import/Export Kit), which expects a manifest.json inside the archive. Uploading a loose .json to the Kit importer, or a Kit .zip to the template importer, will fail — they're two different tools.

Headings show "Type Heading Text Here" instead of my real text.

That's the e-heading widget failing to render its content. Convert it to an html widget with plain <h1>/<h2> tags inside — that always displays correctly.

Everything imported into one horizontal row instead of stacking.

The container is missing "flex-direction": "column" in its style variant. Every e-flexbox container needs it explicitly — Elementor doesn't default to column for these.

The page is completely blank after importing — nothing shows up at all.

Before suspecting the template: deactivate all WordPress plugins and reload the page. A plugin conflict with Elementor's rendering on that page/template is a more common cause of a totally blank result than a broken JSON file. Reactivate plugins one at a time on a test page to find the culprit if it comes back.

Do I need Elementor Pro to import these templates?

No — these are built entirely from the free html (and occasionally video/button) widget types plus flexbox containers, all available in free Elementor. If a specific template does use a Pro-only widget, that widget type will be named explicitly in its notes.

An embedded video or interactive element isn't working after import.

First, confirm the surrounding HTML actually rendered — that alone doesn't prove any embedded <script> or iframe is running. Open the live page and test the specific interactive piece directly. If it's a dedicated Elementor video widget and it looks visually disconnected from its section's background, that's expected — it's a separate flex item with its own plain background. Embedding a raw <iframe> inside the same html widget as the surrounding content avoids that seam.

Can I still edit the page visually in Elementor after importing?

Yes. Once imported, it's a normal Elementor page made of real containers and widgets — click into any section like you would with anything else you built directly in the editor. Content inside an html widget edits as one HTML block rather than as individual text fields, since that's how that widget type works.
✨🐛✨

Filed away in ELEMENTOR-V04-GUIDE.md for next time — both the fixes that mattered and the ones that didn't, so nobody has to re-learn this the slow way.

Custom PHP Development

Building Faster: Our Elementor Template System


By SolarBlu Seth | August 2026

Building Faster: Our Elementor Template System

Over the past few months, we've built something that's fundamentally changed how we deliver websites. Four production-ready Elementor templates—MDU, Sales, Real Estate, and Portfolio—that cut our development time by 60% and make every site launch faster, cleaner, and code-ready from day one.

The Problem We Solved

Every new client project meant starting from scratch. Same hero sections. Same call-to-action patterns. Same responsive grid challenges. We were solving the same design problems over and over, reinventing the wheel on every site.

This wasn't just inefficient—it was unsustainable. We needed a system.

Before

Typical Project Timeline:

  • Design from scratch (3-5 days)
  • Elementor build (2-3 days)
  • Responsive tweaks (2 days)
  • Total: 7-10 days per site

After

Typical Project Timeline:

  • Choose template (1 hour)
  • Customize content (1-2 days)
  • Minor CSS tweaks (4-6 hours)
  • Total: 2-3 days per site

Four Templates. One System.

We identified the four homepage/landing page templates that cover 90% of our client work:

MDU

Multi-Dwelling Unit fiber internet sales pages targeting property owners and landlords.

Status: Production-ready with animated stats and dynamic property grids

Sales

High-conversion sales funnels for SaaS and digital products with built-in lead capture.

Status: Optimized for B2B and B2C conversions

Real Estate

Property showcase pages with featured listings, agent bios, and community highlights.

Status: Fully responsive property galleries and filters

Portfolio

Creative portfolios and agency showcases with project cards and case studies.

Status: Responsive grid system (3 → 2 → 1 column)

How It Actually Works

The magic isn't in some proprietary system—it's in building clean, semantic HTML that speaks Elementor's language.

Our Template-to-Production Workflow:

HTML Template

Convert to JSON

Import to Elementor

Customize & Deploy

Each template is built as clean, modular HTML with inline CSS. We use Elementor's v0.4 JSON format with e-flexbox containers and HTML widgets. This approach gives us:

  • Version control: Templates live in Git, tracking every iteration
  • Consistency: Every client gets the same tested, optimized structure
  • Customization: CSS is scoped and easily editable in Elementor
  • Responsiveness: Media queries handle everything from mobile to 4K displays

Real Impact

⚡ Speed

Projects that took 7-10 days now launch in 2-3 days. That's 60% faster delivery.

💾 Code Quality

Every site gets the same battle-tested responsive system. No more one-off CSS hacks.

🎯 Consistency

Brand identity and UX patterns are baked into the template. Clients get a cohesive product.

🔧 Easy Customization

After import, Elementor's visual builder makes tweaks trivial. No code required for most changes.

What's Next

We're three templates deep and the system is working beautifully. Design refinements are ongoing—responsive behavior on narrow viewports (thanks to sidebar layouts), fine-tuning animations, and polishing micro-interactions.

The real win? We can now focus on what makes each client unique—their content, their brand, their voice—instead of rebuilding the same layout for the hundredth time.

If you're building websites regularly, templates aren't lazy. They're strategic. They free you to do the creative work that actually matters.

Ready to Build Faster?

Our templates are production-ready and continuously refined. Whether you're building MDU properties, sales funnels, real estate portfolios, or creative showcases—we've got a template that works.

Let's Talk About Your Next Project

Custom PHP Development

Advanced WordPress Template Development


Advanced WordPress Template Development

Crafting Templates, Protecting Clients, Building Better Websites

A comprehensive guide to professional WordPress template authorship, child themes, and client-centered design practices

Most WordPress developers learn the basics: create a functions.php, register post types, build a theme. But there's a significant gap between "it works" and "it's production-ready." That gap is where craftsmanship lives.

This guide covers advanced template development practices that separate competent implementations from client-ready solutions. We'll explore how to author templates professionally, structure them for longevity, protect client customizations, and deliver features clients can own without fear of breaking updates.

Throughout, we'll use a real case study: a complete real estate feature for Advanced Themer 13, which demonstrates each principle in practice.

Foundation

1. Template Headers: Your Template's Identity Card

Every WordPress template file should declare itself. The template header—the PHP comment block at the top of the file—tells WordPress what this template is, what it's for, and who wrote it. It's not decoration; it's metadata that unlocks functionality.

Anatomy of a Proper Template Header

Here's the minimal structure:

<?php
/**
 * Template Name: My Custom Template
 * Template Post Type: page
 */

WordPress will now recognize this as a page template and list it in the page template selector. But "minimal" isn't "professional." Here's what a production template header looks like:

<?php
/**
 * Template Name: Properties Landing Page
 * Template Post Type: page
 * Description: Full-width landing page for real estate properties with integrated shortcodes
 * @package Advanced Themer 13
 * @author  SolarBluSeth
 * @version 1.0.0
 * @since   2026-08-27
 */

if ( ! defined( 'ABSPATH' ) ) {
    exit; // Exit if accessed directly
}
Best Practice
Always include: the template name (what users see), post type, a brief description, your package/author info, and the security check if ( ! defined( 'ABSPATH' ) ). The last one prevents direct file access and is non-negotiable in production code.

Making Templates Selectable

Here's where many developers stumble: WordPress looks for templates in the active theme directory first. If you're building a template in a plugin, it won't appear in the page template selector unless you either:

  1. Place it in the theme directory (simplest, but breaks if the theme changes)
  2. Register it with a filter (plugin-agnostic, works with any theme)
  3. Use a child theme (best practice—protects your customizations)

If you're registering a template from a plugin, use the theme_page_templates filter:

add_filter( 'theme_page_templates', function( $templates ) {
    $templates['at13-properties-landing'] = 'Properties Landing Page';
    return $templates;
} );

add_filter( 'template_include', function( $template ) {
    if ( is_page() ) {
        $page_template = get_page_template_slug();
        if ( $page_template === 'at13-properties-landing' ) {
            $plugin_template = plugin_dir_path( __FILE__ ) . 'templates/properties-landing-page.php';
            if ( file_exists( $plugin_template ) ) {
                return $plugin_template;
            }
        }
    }
    return $template;
} );
Case Study

Real Estate Feature: Properties Landing Page

In our real estate implementation, the Properties Landing Page template uses all these principles. The header clearly declares it's a page template authored by the developer. The template includes security checks and proper initialization. It registers via filter so it works with any theme, and it integrates four custom shortcodes ([at13_properties_by_city], [at13_city_navigation], etc.) that pull properties from the database automatically.

Because it's registered with a filter, the template can live in the plugin's /templates directory without touching the active theme—critical for maintenance and updates.

Craftsmanship

2. Authoring Your Templates: Treating Them Like Products

There's a fundamental difference between writing a template and authoring one. Writing creates code that works. Authoring creates code that communicates intent—to other developers, to your future self, and to the client who'll inherit it.

Write Self-Documenting Code

Your template code should tell a story. Use semantic HTML, clear variable names, and inline comments where context isn't obvious:

<?php
// Output the hero section with dynamic company branding
if ( $company_name = get_option( 'at13_company_name' ) ) {
    echo '<section class="hero">';
    echo '  <h1>' . esc_html( $company_name ) . '</h1>';
    echo '</section>';
}

// Display featured properties using the custom shortcode
echo do_shortcode( '[at13_featured_properties limit="6"]' );
?>

Notice the comments explain why this code is here, not what it does (the code itself shows that). Use esc_html(), wp_kses_post(), and other sanitization functions—not as an afterthought, but as part of your authoring process.

Structure Templates for Readability

Long templates become maintenance nightmares. Break them into logical sections with clear separators:

<?php
get_header();
?>

<main id="primary">

    <!-- ═══ HERO SECTION ═══ -->
    <?php get_template_part( 'sections/hero' ); ?>

    <!-- ═══ FEATURED PROPERTIES ═══ -->
    <?php get_template_part( 'sections/featured' ); ?>

    <!-- ═══ PROPERTIES BY CITY ═══ -->
    <?php get_template_part( 'sections/by-city' ); ?>

    <!-- ═══ CALL TO ACTION ═══ -->
    <?php get_template_part( 'sections/cta' ); ?>

</main>

<?php get_footer(); ?>

By using get_template_part(), you achieve several things:

  • The main template is scannable and tells the page's story at a glance
  • Each section is independently testable and editable
  • Clients can override sections without touching the full template
  • Updates to the plugin don't overwrite client customizations

Use Template Hooks and Filters

WordPress hooks exist for a reason: they let other code (yours, plugins, themes, clients) extend functionality without forking the template. Add strategic hooks:

<?php
get_header();
do_action( 'at13_landing_page_before_hero' );
?>

<section class="hero">
    <?php do_action( 'at13_landing_page_hero_inner' ); ?>
</section>

<?php
do_action( 'at13_landing_page_after_hero' );
echo do_shortcode( '[at13_featured_properties]' );
do_action( 'at13_landing_page_after_featured' );

get_footer();
?>

These hooks let clients, other developers, and future you inject code without editing the template directly. That's professional authorship.

Best Practice
Author templates assuming they'll be customized. Use semantic HTML, add strategic hooks, break complex layouts into template parts, and comment your intent. Treat your template like a published interface—because it is.
Case Study

Real Estate: Modular Template Architecture

The real estate feature templates follow this principle strictly. The main properties-landing-page.php is ~300 lines of mostly template parts and shortcodes. Each shortcode ([at13_properties_by_city], [at13_featured_properties], etc.) is independently testable and can be placed on any page. The template registers hooks at key points, allowing clients to extend behavior without forking.

Single property pages (single-sbnet_real_estate.php) separate concerns: property meta data, gallery display, neighborhood section, and booking CTAs are all in different sections. A client can override just the gallery section via a child theme without touching the entire template.

Architecture

3. Child Themes: Protecting Customizations Across Updates

Here's a scenario every WordPress developer knows: You customize a theme for a client. Six months later, the theme updates. The client's customizations vanish. The client is furious. You lose a weekend restoring everything.

Child themes solve this—if you use them correctly.

What a Child Theme Is (And Isn't)

A child theme is a lightweight theme that inherits from a parent theme. Any customizations live in the child; the parent theme can update without touching them. It's not an optional feature—it's professional practice.

Here's the minimal child theme structure:

themes/
└── astra-child/
    ├── style.css
    ├── functions.php
    └── templates/
        └── properties-landing-page.php

The style.css must declare the parent:

/*
 * Theme Name: Astra Child
 * Theme URI: https://example.com
 * Description: Child theme for real estate customizations
 * Author: Your Name
 * Author URI: https://example.com
 * Template: astra
 * Version: 1.0.0
 */

/* Import parent theme styles */
@import url('../astra/style.css');

/* Your customizations below */

The Template: astra line is critical—it tells WordPress which theme this is a child of.

Where Customizations Live

The child theme's functions.php loads after the parent's, so your hooks run last and can override parent behavior:

<?php
// In astra-child/functions.php

function astra_child_scripts() {
    wp_enqueue_style(
        'astra-child-style',
        get_stylesheet_directory_uri() . '/style.css'
    );
}
add_action( 'wp_enqueue_scripts', 'astra_child_scripts' );

// Override or extend parent theme behavior
add_filter( 'at13_properties_per_page', function() {
    return 12; // Show 12 properties instead of 6
} );

// Add custom hooks specific to the client
add_action( 'wp_footer', function() {
    echo '<!-- Custom client footer HTML -->';
} );
?>

Template files (like properties-landing-page.php) live in the child's templates/ directory. WordPress automatically checks the child theme before the parent, so client customizations take precedence.

The Child Theme Workflow

When building features for a client:

  1. Keep plugin templates generic – The plugin provides the default implementation
  2. Place client customizations in the child theme – All client-specific code lives here
  3. Update the plugin without fear – Client changes are safe; they live in the child theme
  4. Let the client own their child theme – They can modify it forever without worrying about theme updates

Why This Matters

Without child themes, updating a parent theme (or plugin templates) risks overwriting customizations. With a child theme, customizations are isolated and safe. The parent can update, the child stays untouched.

This is especially important for features like real estate templates, which clients often want to customize (colors, copy, layout). A child theme is where those customizations belong.

/* Without child theme (risky) */
wp-content/themes/astra/
├── functions.php (updates overwrite changes)
└── templates/properties-landing-page.php

/* With child theme (safe) */
wp-content/themes/astra-child/
├── functions.php (safe; only client code)
└── templates/properties-landing-page.php (custom version)
Best Practice
Always use a child theme for client customizations. Never edit the parent theme directly. This protects your work across updates and gives clients a clear place to own their customizations.
Case Study

Real Estate: Child Theme Strategy

For the real estate feature, the base templates live in the plugin (advanced-themer-13/templates/). They're generic and work with any theme. But when delivered to a client, we create an astra-child theme containing:

astra-child/
├── style.css (includes child theme declaration)
├── functions.php (client-specific hooks)
└── templates/
    └── properties-landing-page.php (client's custom version)

The client's version of properties-landing-page.php might customize colors, add a custom hero, include their logo, or change property counts. None of this touches the plugin. When the plugin updates, the client's customizations are safe.

Service

4. Client-Centered Design: Building Features Clients Can Own

The best templates are ones clients don't need to touch—but can, if they want to. This balance is what separates commodity WordPress work from professional client service.

Designing for Client Independence

When you deliver a feature to a client, design it so they can:

  • Customize without coding – Use WordPress settings, post meta, and admin pages
  • Modify templates if needed – But only in their child theme, not the plugin
  • Extend functionality safely – Through hooks, filters, and documented APIs
  • Update without fear – Plugin updates won't touch their customizations

This requires thinking like a client. What settings do they want to control? What should be hard-coded vs. configurable?

Building an Admin Settings Page

For complex features, an admin page puts control in the client's hands:

<?php
// In a plugin file
add_action( 'admin_menu', function() {
    add_menu_page(
        'Real Estate Settings',
        'Real Estate',
        'manage_options',
        'at13-real-estate',
        'render_real_estate_admin',
        'dashicons-building'
    );
} );

function render_real_estate_admin() {
    ?>
    <div class="wrap">
        <h1>Real Estate Settings</h1>

        <form method="post">
            <table class="form-table">
                <tr>
                    <th><label for="properties_per_page">Properties Per Page</label></th>
                    <td>
                        <input
                            type="number"
                            id="properties_per_page"
                            name="at13_properties_per_page"
                            value="<?php echo esc_attr( get_option( 'at13_properties_per_page', 12 ) ); ?>"
                        >
                    </td>
                </tr>
                <tr>
                    <th><label for="google_maps_api">Google Maps API Key</label></th>
                    <td>
                        <input
                            type="password"
                            id="google_maps_api"
                            name="at13_google_maps_api"
                            value="<?php echo esc_attr( get_option( 'at13_google_maps_api' ) ); ?>"
                        >
                    </td>
                </tr>
            </table>
            <?php submit_button(); ?>
        </form>
    </div>
    <?php
}

// Handle form submission
add_action( 'admin_init', function() {
    if ( isset( $_POST['at13_properties_per_page'] ) ) {
        update_option( 'at13_properties_per_page', intval( $_POST['at13_properties_per_page'] ) );
    }
    if ( isset( $_POST['at13_google_maps_api'] ) ) {
        update_option( 'at13_google_maps_api', sanitize_text_field( $_POST['at13_google_maps_api'] ) );
    }
} );
?>

Now clients can control core settings without touching code. They own their configuration.

Document Everything

Professional delivery includes documentation. Your client should receive:

DocumentContents
Quick Start Guide3 steps to using the feature. No jargon.
Setup GuideConfiguration, settings, required credentials (API keys, etc.)
Customization GuideHow to modify colors, text, layout. Which files to edit.
TroubleshootingCommon issues and solutions
API ReferenceHooks, filters, functions they can use to extend
Case Study

Real Estate: Complete Client Delivery

The real estate feature includes:

  • QUICK_START.txt – A visual 5-minute guide with step-by-step screenshots
  • LANDING_PAGE_SETUP.md – Complete customization: how to change colors, company name, phone number
  • IMPLEMENTATION_SUMMARY.md – Full technical overview of what's included and how it works
  • SHORTCODES_GUIDE.md – Reference for the 4 shortcodes and how to use them on any page
  • Admin Settings Page – Control Google Maps API, per-page counts, SEO settings without editing code

The client gets everything they need to use the feature, customize it, and extend it. They don't need a developer (though they can hire one to extend further). This is what professional delivery looks like.

Provide an Extension API

Let developers (and clients who hire developers) extend your work:

<?php
/**
 * Hook: Filter the number of properties displayed
 *
 * Example:
 * add_filter( 'at13_properties_per_page', function() {
 *     return 20; // Show 20 instead of default
 * } );
 */
$per_page = apply_filters( 'at13_properties_per_page', 12 );

/**
 * Hook: Action before property list renders
 *
 * Example:
 * add_action( 'at13_before_properties_display', function() {
 *     echo '<p>Current Listings:</p>';
 * } );
 */
do_action( 'at13_before_properties_display' );

// Render properties...
?>

Documented hooks let clients (or their developers) customize behavior without forking your code. That's scalable client service.

Best Practice
Deliver features with admin settings pages, comprehensive documentation, a child theme for customizations, and documented extension APIs. This lets clients own their implementation and hire developers to extend it later without issues.

Synthesis

Putting It All Together: A Professional Workflow

Here's the workflow that produces professional, maintainable, client-friendly WordPress features:

1. Build the Plugin (or Core Feature)

  • Create templates with proper headers in /templates
  • Register templates using filters (so they work with any theme)
  • Author templates with semantic HTML, hooks, and clear structure
  • Provide an admin settings page for configuration
  • Document everything: Quick Start, Setup, Customization, API Reference

2. Create a Child Theme for Client Customizations

  • Generate a minimal child theme specific to the client
  • Copy any templates the client wants to customize into /templates
  • Add client-specific hooks and filters to functions.php
  • Keep client CSS in the child theme's style.css

3. Deliver with Documentation

  • Hand over the complete package: plugin + child theme + docs
  • Run through the Quick Start guide with the client
  • Show them where to find each guide (Setup, Customization, API)
  • Explain that their customizations live in the child theme (safe from updates)

4. Future Maintenance

  • Update the plugin without worrying about overwriting client code
  • Client's customizations (in child theme) stay intact
  • If new features are added to the plugin, client gets them automatically
  • If client wants custom versions, they stay in the child theme
Real World

The Real Estate Feature in Production

The real estate feature follows this exact workflow:

Plugin (advanced-themer-13): Contains the base implementation — Properties post type, 5 metaboxes, admin settings page, 4 shortcodes, base templates, Google Maps integration, SEO schema. Everything is hook-enabled and documented.

Child Theme (astra-child): Contains client customizations — custom properties-landing-page.php with the client's logo and colors, custom functions that filter shortcode output, client-specific CSS for their brand.

Documentation: Quick Start (get properties displaying in 5 minutes), Setup Guide (configure Google Maps, settings), Customization Guide (change colors and company name), Implementation Summary (technical overview), Shortcodes Reference (how to use on other pages).

Result: The client can use the feature immediately, customize it without touching the plugin, and hire future developers who won't break anything when they update. The original developer can update the plugin and add features with zero risk to the client's customizations.

Takeaway

Professional WordPress Is Craftsmanship

The difference between WordPress work and professional WordPress is that last layer: the care you take in authoring templates, protecting client customizations, and delivering features clients can own.

Use child themes. Write self-documenting templates. Register hooks. Provide admin interfaces. Document everything. This isn't extra work—it's the only way to build features that survive updates, scale to multiple clients, and still feel good months later when maintenance comes due.

Your templates aren't files; they're products. Author them that way.


Advanced WordPress Template Development | A guide to professional template authorship, child themes, and client service.

Based on real production experience building the Advanced Themer 13 real estate feature—from concept through delivery and ongoing maintenance.

Custom PHP Development

From "What is WordPress?" to Expert WordPress Developer – My 30-Year Journey


From "What is WordPress?" to Expert WordPress Developer – My 30-Year Journey

How a single question sparked a 30-year obsession with WordPress. From PHP developer to freelancer to building over $1 billion in client sales.

The Spark That Started Everything

I still remember the day someone asked me: "Can you handle WordPress?"

Back then, I had no idea what WordPress was. I was working in technical support, as a PHP developer, handling server configurations and custom development projects. I was good at what I did – solving problems, writing clean code, tracking revenue, sales, commissions and chargebacks.. But WordPress? I'd never really worked with it.

That single question changed my entire career trajectory.

What happened next wasn't some grand master plan. It was curiosity, persistence, and refusing to let a knowledge gap stop me from trying something new. That's the real story of how I became a WordPress developer – not through certification programs or online courses, but through real-world problem-solving and a willingness to go "all in" when I found something I was good at.


The Beginning: "I'll Figure This Out"

When that first WordPress question came in, I could have said no. Instead, I said: "Let me learn this."

I dove headfirst into WordPress. Started building WordPress themes from scratch. Learned the WordPress architecture, the hooks and filters system, how the entire ecosystem works. I wasn't just installing WordPress and using page builders – I was learning the code, understanding the database structure, and building custom solutions.

At the same time, I was still working my full-time job. WordPress was a side project that quickly became an obsession.

The breakthrough came when I read the WordPress Bible – that deep dive into professional WordPress development that fundamentals are built on. It wasn't casual reading. Every page added fuel to a fire that was already burning. Suddenly, WordPress wasn't just a platform – it was a craft worth mastering.


The Freelance Era: Learning Speed, Reliability, and Revenue

My real education came on freelance platforms.

I posted projects on Freelancer. Upwork. Those early gigs taught me something no course ever could: clients don't care about perfection – they care about results delivered on time.

I was competing against hundreds of other developers. Most were cheaper. Many promised the moon. But I had one advantage: I delivered fast. Reliably. Without excuses.

I also got creative. Craigslist became my marketplace. I was literally selling complete WordPress websites to local clients, direct. Credit cards and PayPal were my payment processors. This was the early 2000s – no fancy payment platforms, no automation. Just direct, honest transactions with people who needed websites.

But here's the reality nobody talks about: freelance doesn't pay the bills at first.

Clients were flaky. Projects dragged. Rates were low. I was still holding down my full-time job because I had to. The freelance work was good experience and decent money on the side, but it wasn't stable enough to live on – not yet.

So I kept both. Day job for security. Freelance work for learning and growth.


The Turning Point: Speed + Reliability = Revenue

Everything changed when I realized something simple but powerful:

Most developers are slow. Most are unreliable. Most disappear after launch.

If I could flip that script – deliver fast, deliver reliably, actually care about results after the project launched – I could stand out completely.

I started tracking what worked:

  • Fast turnaround times became my signature
  • Reliable delivery became my reputation
  • Post-launch support became my differentiator

While other developers were ghosting clients, I was still answering support tickets months later. While others took weeks on simple projects, I was delivering in days.

The reviews came naturally. Happy clients left testimonials. Word-of-mouth started happening.

And here's what mattered most: I wasn't just doing work. I was generating revenue for clients. Landing pages I built actually converted. WordPress sites I optimized actually ranked. This wasn't theoretical – I could track the numbers.


What 30+ Years of WordPress Development Taught Me

Looking back at three decades of WordPress development, the lessons are clear:

1. WordPress Mastery > Page Builders

Most modern "WordPress developers" use Elementor or Divi and call themselves experts. They're not wrong to use these tools, but they're missing the real power of WordPress.

I learned the WordPress core. The hooks system. Custom post types. Advanced taxonomies. Database optimization. Security hardening. These skills mean I can solve problems that page builders can't even touch.

2. Revenue Generation > Feature Lists

For years, I chased project features. More plugins. More customization. Bigger feature sets.

Then I realized: clients don't care about features. They care about revenue.

A landing page that converts is worth 100x more than a website with perfect design but zero sales. An optimized WordPress site that ranks on Google beats a flashy site that nobody can find.

This shift in thinking changed everything about how I approach WordPress development.

3. Reliability Wins in a Flaky Industry

The freelance WordPress marketplace is chaos. Most developers disappear. Most sites break after launch. Most clients get abandoned.

I built my reputation on the opposite: I stick around. I support clients long-term. I fix problems when they happen. I optimize sites after they launch.

This consistency, this reliability – it's become my most valuable asset.

4. Learning Never Stops

The WordPress I learned 30 years ago is completely different from modern WordPress. PHP has evolved. Security has gotten more complex. Performance optimization is now critical.

Every few years, I go deep on something new: the WordPress REST API, performance optimization techniques, the latest security standards, modern PHP practices.

Staying current isn't optional – it's the cost of staying relevant.


From Side Project to Full-Time Career

The transition from part-time freelancing to running a full-time WordPress development business wasn't dramatic. It was gradual.

At some point, the freelance work was generating enough reliable revenue that I could leave the day job. Clients were returning. Referrals were coming in. The reputation I'd built – fast, reliable, results-driven – was attracting better clients who valued quality over cheap pricing.

I stopped competing on price. Started competing on results.

The turning point: tracking actual client revenue generated through my work.

When you can say "I've generated $1+ billion in sales for clients through WordPress landing pages and optimization," the conversation changes completely. You're not "a developer." You're "a developer who makes clients money."

That's what separates the commodity WordPress developers from the experts.


What Started as "What is WordPress?" Became a Career

I think about that original question sometimes. "Can you handle WordPress?" A question I couldn't answer at the time.

But because I said "I'll learn this," I ended up building thousands of WordPress sites. Generating over a billion dollars in revenue for clients. Learning PHP deeply. Understanding security architecture. Mastering performance optimization. Building a 30-year track record of reliable, results-driven development.

None of that was planned. It was just: be curious, solve problems, deliver reliably, keep learning.

The WordPress developers who thrive long-term aren't the ones chasing trends. They're the ones who master the craft. Who understand the code. Who deliver results. Who actually care about their clients' success.

That's been my approach for 30 years. And it still works.


Still Learning, Still Building

WordPress has evolved dramatically in 30 years. I've evolved with it.

Today, I combine deep WordPress expertise with modern development practices. Performance optimization. Security hardening. Technical SEO. Conversion-focused design. Revenue tracking.

The fundamentals haven't changed: solve problems, deliver reliably, track results, keep learning.

But the tools, the techniques, the standards – those keep evolving. And I keep evolving with them.

If you're looking for a WordPress developer who actually understands WordPress – not just the surface level, but the deep architecture and how to use it to generate real results – that's what 30 years of this work looks like.


Ready to Work With a Real WordPress Expert?

If you need WordPress development that actually generates results – landing pages that convert, sites that rank, security that holds, performance that matters – let's talk.

📞 Call: 312-869-4206

About the Author

I'm a WordPress developer in Champaign, Illinois with 30+ years of experience building custom WordPress solutions, optimizing for conversion and SEO, and generating measurable results for clients across central Illinois. When I'm not building WordPress sites, I'm learning new optimization techniques and solving client problems.

Custom PHP Development

Advanced Themer: WordPress Management Made Easy

🔧 Advanced Themer: WordPress Management Made Easy

WordPress is powerful, but managing content analytics, backups, CSS customization, and media can drain your time. Advanced Themer solves this by centralizing everything—backups, traffic insights, post performance, and recent uploads—into one intuitive admin dashboard. We built it to save you hours every week.

The Problem: WordPress Management is Fragmented

Every WordPress site needs backups, analytics, and content management. But the tools are scattered:

  • Backups are either manual or handled by separate plugins
  • Traffic analytics require external services like Google Analytics
  • Post performance data is hidden in multiple places
  • Custom CSS for individual posts requires manual workarounds
  • Media uploads are tedious to catalog and share

This fragmentation wastes time, increases complexity, and leaves sites vulnerable.

60%
Of sites hit by data loss annually
$5,600
Average cost of data loss incident
3 hrs/week
Time spent managing backups manually
42%
Of businesses unprepared for recovery
 

The Solution: Advanced Themer Suite

We engineered Advanced Themer to consolidate WordPress management into a single, purpose-built interface. Every feature was designed with one principle: make expert-level site management accessible to everyone.

📊 Content Views Analytics

Track post and page performance in real-time. See daily, weekly, and monthly views. Identify your top-performing content instantly. Sort by traffic period to spot trends.

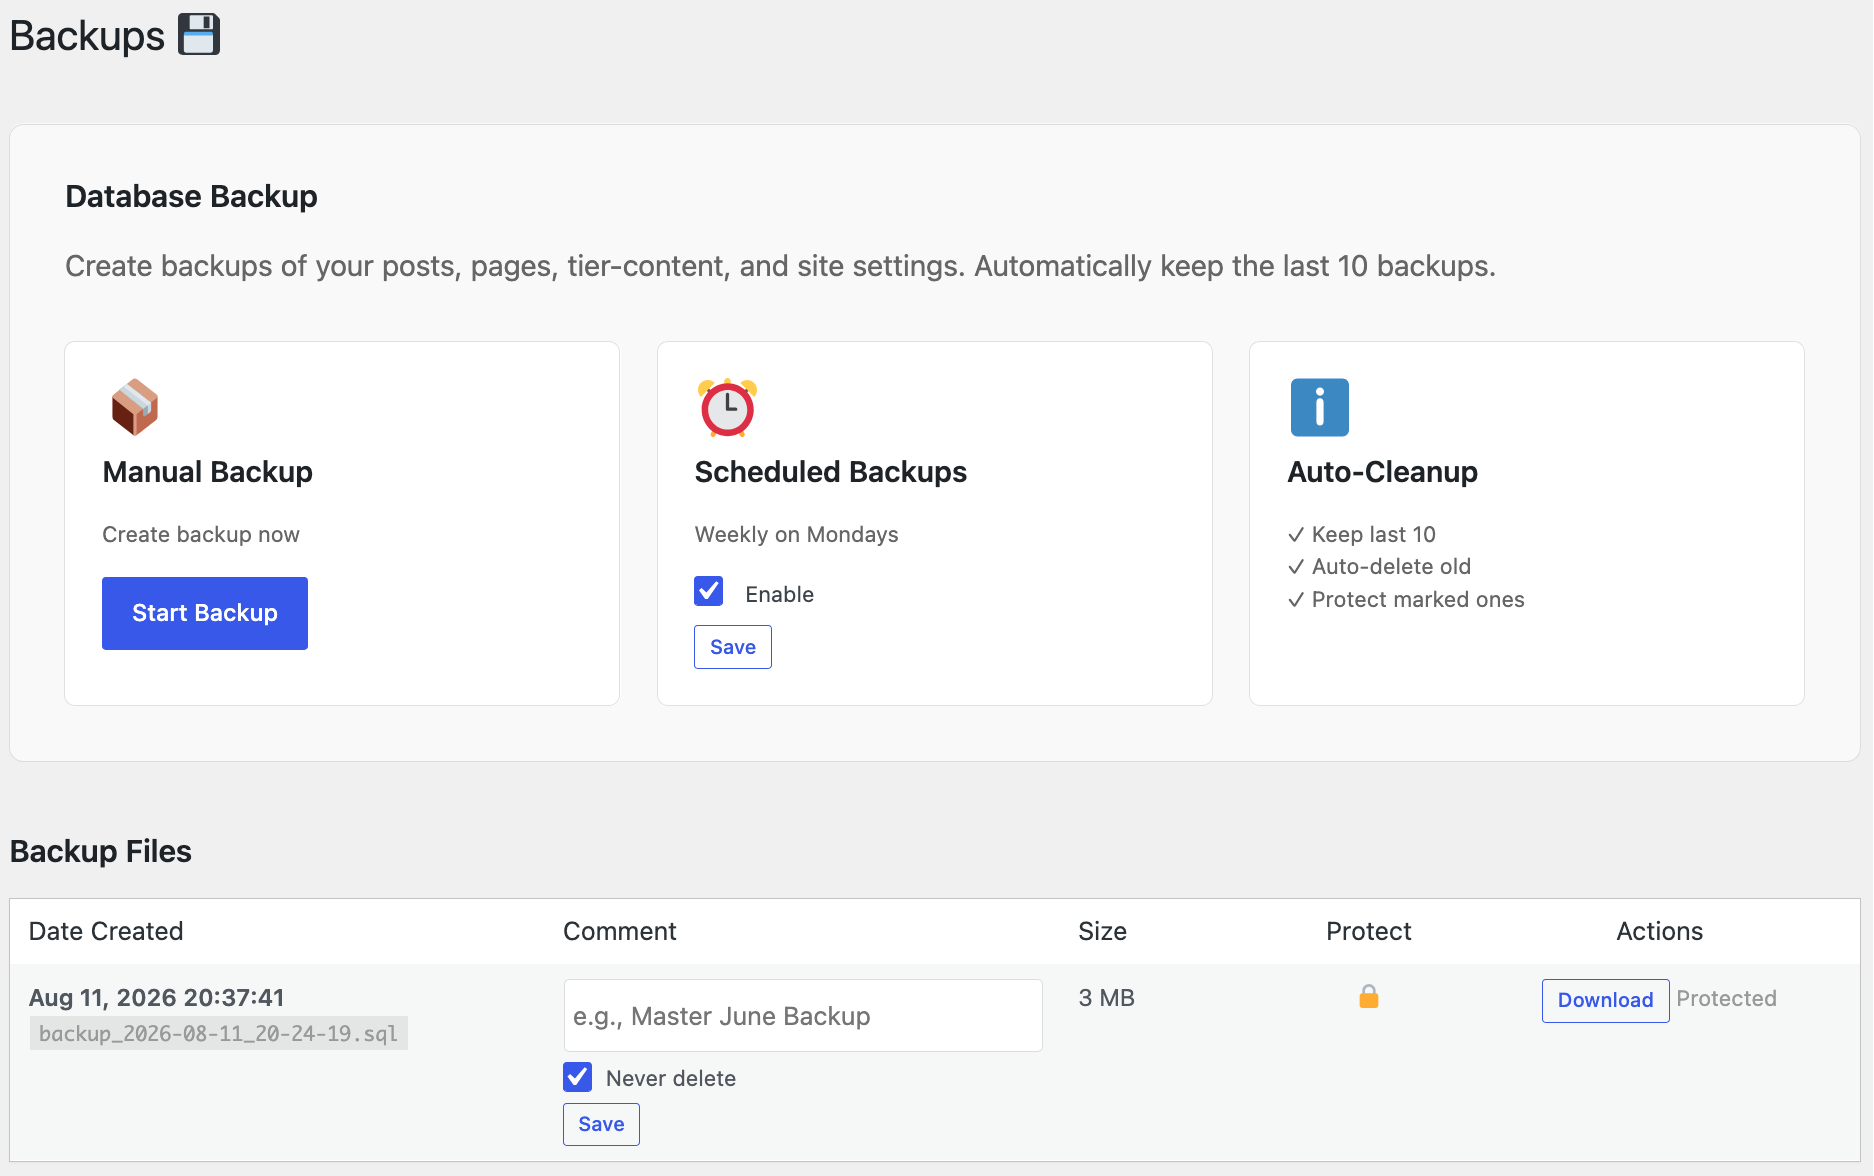
💾 Automated Backups

Weekly backups run automatically every Monday. Keep the last 10 backups. Mark critical backups as "never delete." Add comments like "Master June Backup" for easy identification.

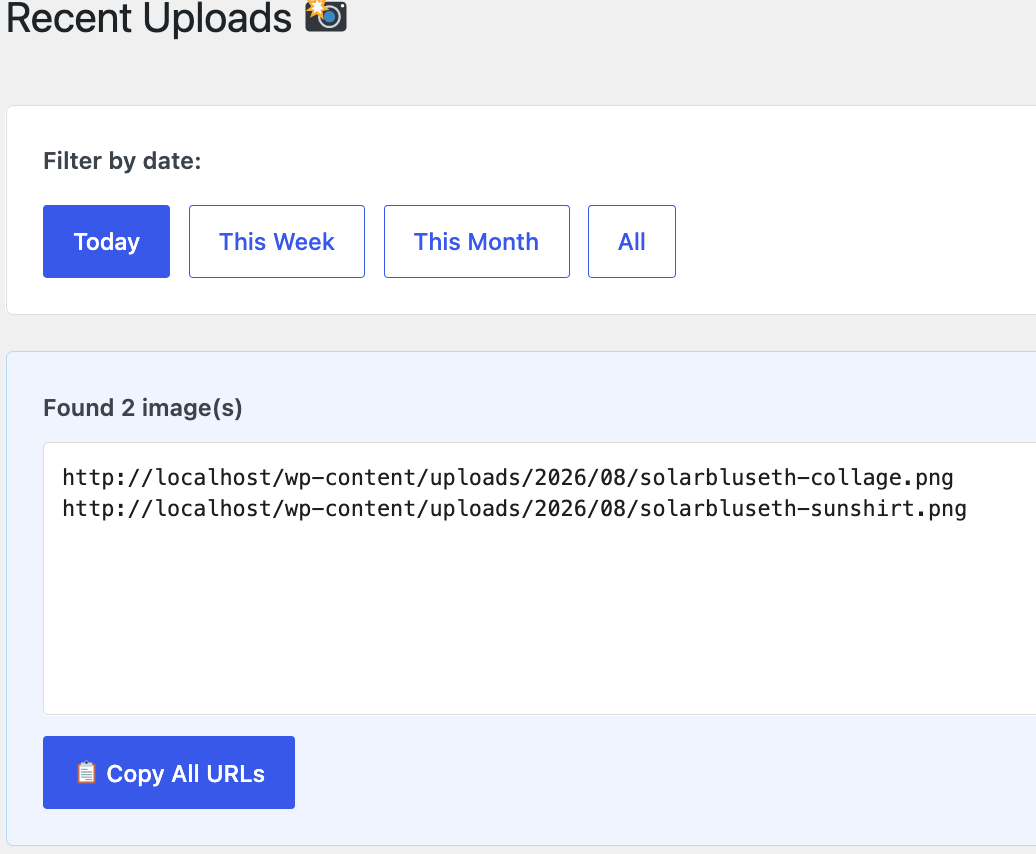
📸 Recent Uploads Tracker

See all images uploaded today, this week, or this month. Copy all URLs with one click. Share media lists with developers or AI assistants instantly—no more manual linking.

🎨 Post-Specific CSS

Add custom CSS directly to individual posts or pages. No more broken formatting from newlines. CSS is stored safely as post metadata and loaded only for that content.

🔐 Secure File Storage

Backups stored outside the web root. Protected by .htaccess. Downloaded through PHP (not direct file access). WordPress nonce verification on all actions.

⚡ One-Click Recovery

Download backups as clean SQL files. Import into any database tool. No decompression needed. Restore your site in minutes, not hours.


Feature Breakdown: What You Get

1. Content Views Analytics Dashboard

Stop guessing what content performs. The Content Views dashboard shows:

  • Daily trends — 30-day line chart showing posts vs. pages vs. total views
  • Quick stats — Today, this week, this month at a glance
  • Top posts/pages table — Ranked by total views with breakdowns by time period
  • Post type clarity — Know instantly if traffic is coming from posts or pages
  • Sort by period — Click "Today" to see which content is hot right now

No external analytics required. Data is tracked natively, stored securely, and updated in real-time.

2. Automated Backup System with Scheduling

Backups are non-negotiable. But manual backups fail. Advanced Themer automates the entire process:

  • Weekly scheduling — Every Monday at 2 AM, automatically backs up your database
  • Smart retention — Keeps last 10 backups, auto-deletes old ones to save space
  • Never-delete flag — Mark critical backups to protect them from auto-cleanup
  • Comments & labels — Add descriptive notes: "Pre-launch", "Master June", etc.
  • One-click downloads — Get clean SQL files ready for import
  • Delete protection — Toggle "Protect" to prevent accidental deletion

Advanced Themer Backups Dashboard

⚠️ Why This Matters

A single ransomware attack costs an average business $5,600. Most recover takes days without backups. Advanced Themer's automated approach means recovery takes minutes, not weeks. Backups are your insurance policy—make sure it runs automatically.

3. Recent Uploads Media Tracker

Upload images? Need to share them with your dev team or AI assistant? Advanced Themer's Recent Uploads tracker makes it effortless:

  • Filter by date — Today, this week, this month, or all
  • Thumbnail previews — See your images at a glance
  • One-click copy all — Copy all image URLs as plain text, ready to paste into chat or documentation
  • Image info — Dimensions, file size, upload date
  • Individual copy buttons — Copy single URLs when needed

Upload 50 images for a blog post or product gallery? Copy all URLs in one click. No manual linking. No forgotten images. Perfect for collaborating with developers and content creators.

Advanced Themer Recent Uploads Dashboard

4. Post-Specific CSS Meta Box

WordPress's content editor mangles CSS—it converts newlines to <br> tags, breaking stylesheets. Advanced Themer solves this with a dedicated CSS meta box:

  • Clean CSS storage — Stored as post metadata, not in content
  • No formatting issues — Newlines and spacing preserved exactly
  • Per-post scope — CSS only affects that specific post or page
  • Works with tier-content — Add CSS to Tier Content posts too
  • Auto-scoped selectors — Use `.post-123` to target specific content

Perfect for custom styling on individual posts without touching the theme. CSS loads in the page footer, ensuring clean separation.


Why Choose Advanced Themer?

1. Purpose-Built, Not Cobbled Together

Most WordPress sites use 5-10 different plugins for what Advanced Themer does in one. Each plugin adds weight, security surface area, and complexity. We built one integrated suite instead.

2. Security by Design

  • Backups stored outside the web root (not in public_html)
  • .htaccess protection prevents direct file access
  • PHP-streamed downloads (no direct HTTP exposure)
  • WordPress nonce verification on every action
  • Admin-only capability checks throughout
  • No external dependencies or third-party services

3. Developer-Friendly

Whether you're a solo developer or managing 100 sites:

  • View real traffic data without Google Analytics setup
  • Quick CSS edits per-post without theme modifications
  • Media lists for AI content generation
  • Backup schedules you can trust to run themselves

4. Enterprise-Grade Without the Complexity

Large teams need reliable systems. Advanced Themer delivers:

  • Automatic weekly backups with full audit trail
  • Content performance tracking across all posts and pages
  • Centralized media management for distributed teams
  • Protected backups that can't be accidentally deleted
 

Real-World Impact

Scenario 1: Content Creator

Before: Upload 40 images. Manually copy each URL into a spreadsheet. 30 minutes lost.

After: Upload 40 images. Go to Recent Uploads. Click "Copy All URLs". Paste into document. 2 minutes total.

Scenario 2: Development Team

Before: Site goes down. Find backup plugin. Download backup. Decompress it. Import to database. Troubleshoot for hours. Restore from scratch.

After: Site goes down. Open Advanced Themer backups. Download this morning's backup (clean SQL). Import to database. Restore and test. 15 minutes.

Scenario 3: Marketing Manager

Before: "Which blog posts drive the most traffic?" Check Google Analytics. Wait for it to load. Cross-reference URLs. Spend 20 minutes guessing.

After: Open Content Views tab. Sort by "This Week". See top 5 posts instantly. Spend 1 minute making data-driven decisions.


Get Started Today

Advanced Themer is built into SolarBlu's WordPress infrastructure. It's available as a plugin for your site. Start with automated backups this week. You'll wonder how you managed without it.

Stop juggling plugins. Stop manual backups. Stop guessing which content performs. Advanced Themer gives you one dashboard, one system, one source of truth.

Expert WordPress management. Made simple.

Questions? Advanced Themer is actively maintained and updated. Built by developers, for developers and site managers who demand reliability.

SolarBlu
Scroll to Top